Filament Health Monitor (Part 1 - Introduction)
A web-enabled 3D printer filament monitor system and spool holder that tracks weight, humidity, temperature, and filament color — all accessible remotely.
Introduction / Summary
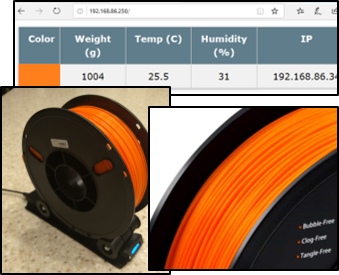
The Filament Health Monitor is a web-enabled 3D printer filament monitor system and spool holder. This setup monitors and reports the following:
- Weight of filament remaining (up to 5 kg)
- Humidity
- Temperature
- Color of material loaded
It also includes a small LCD screen which reports the weight, humidity, and the current IP address of the monitor locally.
Series Quick Links
- Part 1 — Introduction (this post)
- Part 2 — Mechanical Assembly
- Part 3 — Electronics
- Related: Rediscovering Wire Wrapping
- Related: Arduino Development in VS Code
Preamble
This is a multi-part series on the construction of a new 3D printer Filament Health Monitor system. It is my express intent and hope that you will build, modify, and expand on the product I present.

Affiliate note: From time to time I provide links to Amazon products I used in this build. As an Amazon Associate I earn from qualifying purchases at no extra cost to you. See the full disclosure.
The Requirements
My current storage solution works fine for keeping things dry, but I am a really bad estimator of how much filament I have remaining — which leads to a lot of remnant spools. My filament runout sensors are great, but not in the middle of the night. I want to be able to run a print and know with confidence that I have enough to get through it. To know how much I have, I will need to weigh it. Next, the device must allow the spool to rotate. To know when to change out the desiccant, I will need to monitor humidity levels and possibly temperature. Finally, if I am printing remotely, I’d like to know what color filament is loaded (stretch goal). Requirements:
- Shall be able to weigh the spool
- Shall allow the spool to rotate
- Should monitor humidity
- Should monitor temperature
- Could detect color of filament
- Shall be remotely accessible
Does it Already Exist?
I’ve seen a few different filament storage methods and found that a dry box of some sort is a must. After browsing for existing solutions I stumbled on two offerings on Amazon.
The first, from eSun, was pretty neat. It reported temperature, humidity, and the weight of the filament remaining on a small front screen. However, at the price point I couldn’t imagine buying five or six as I intended. Also, you couldn’t see the stats remotely — a real hope I had.
The second, from Polymaker, was even more basic. It is big enough to fit two spools at once but other than that there is not much to it — a humidity readout and a place for desiccant. That’s it. I think we can do better.
Materials
After looking around a bit I was able to find all of the devices and parts I was going to need. I bought more than I needed to allow for experimentation and possible future builds. Most of the items I used are listed below.
Electronics BOM
| Item | Qty |
|---|---|
| D1 Mini, ESP8266 WiFi Board | 1 of 5 needed |
| OLED Display Module 0.91 Inch | 1 of 2 needed |
| TCS-34725 RGB Color Sensor | 1 |
| HX711 5KG Digital Load Cell (Weight Sensor) | 1 |
| DHT11 Humidity and Temperature Sensor | 1 of 2 needed |
Mechanical BOM
| Item | Qty |
|---|---|
| 608 Skate Board Bearings | 4 |
| 5/16-18 x 1-1/2” Hex Head Cap Screw | 4 |
| 5/16-18 Nylon Insert Hex Lock Nuts | 4 |
| M2 bolts (assorted) | ~4 |
| PETG Filament, 1.75mm (PLA or ABS also fine) | 1 spool |
Of note, the above BOM does not include the wire or tools I used to build this monitor. For those, check out my article on wire wrapping — a somewhat forgotten technique for building low run-count circuits that are repairable and highly durable. It made this project so much easier and I wish I had learned to do it a long time ago.
3D Printed Parts
All STL files, plus STP and F3D of the full assembly, are on Thingiverse (Thing 3996616). Print one of each STL file with a few exceptions for the wheel and wheel spacers.
| Part | Qty |
|---|---|
| Bone | 1 |
| Front Electronics | 1 |
| LCD Cover | 1 |
| Rear Cover | 1 |
| Rear Electronics | 1 |
| Base Platform | 1 |
| Wheel | 4 |
| Wheel Spacer | 4 |
I printed my build from Octane PETG, but most PLA and ABS filaments should be absolutely fine. Print settings:
- 3 perimeters
- 30% Hex infill
- 4 bottom layers / 4 top layers
Most parts are optimized to be printed without supports except the rear and front electronics cases. These will need supports to handle the mounting arm.
In the next post we will cover the assembly of the Monitor, then the electronics and software.